Preparing your booklet, magazine, brochure or catalogue for print
Out of all the printed products on offer here at StuPrint, multi-page items such as booklets, magazines, brochures and catalogues are the trickiest to get the artwork correct for. You need to make sure that each page is formatted correctly and put in the right order for the finished booklet to look great and make sense. But don’t worry…this handy little article is here to help.
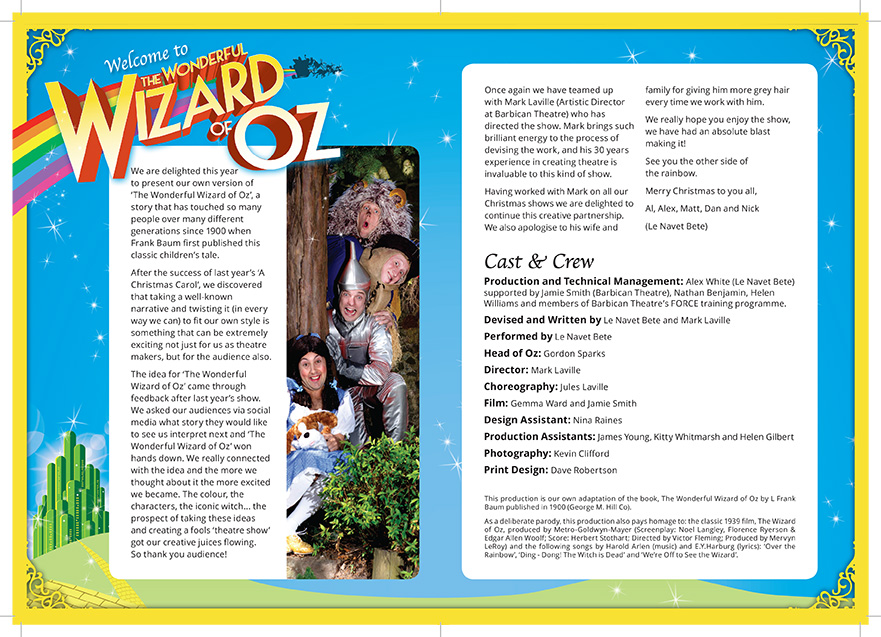
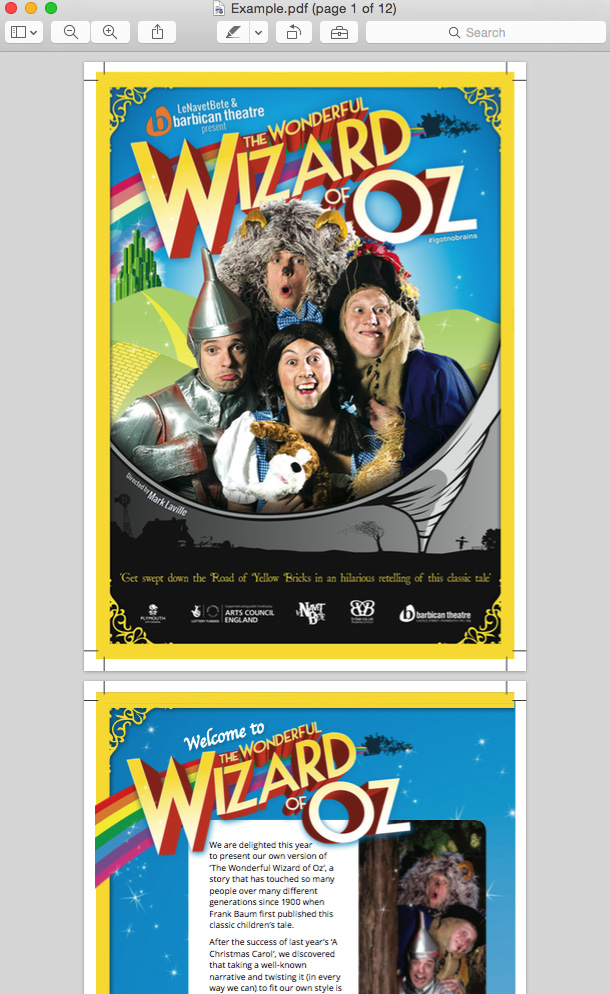
Before we go through everything, have a look at this booklet artwork for a past order to see and ideal version of what we need. Click here to open the PDF (18.5MB so give it some time to load!)
File Type:
By far and away, the best file type for going to print with are PDFs. They allow for the best resolution as well as giving you the option to upload a single, multi-paged document as in the above example. Best thing of all is that almost all design programs (InDesign, Publisher, Photoshop, Word, PowerPoint etc.) allow you to export your booklet design straight to PDF. This means that you lock-down your design as you want it too look and send it to us in a print ready format.
Don’t worry if it isn’t possible to save and combine your pages into one PDF. The next best thing is to save each page of your booklet individually and upload them to our site. The important thing to do here is to make sure you label your files as the correct page number (page 1, page 2, page 3…) so that we know where to put them in the booklet.
Booklet Printing: Singles vs. Spreads:
Traditionally, you can set up your artwork in two ways: side-by side spreads or booklet singles.
Side-by-side Spreads:
Singles:
The difference here is that side-by-side spreads have consecutive pages next to each other whilst single pages are on there own. The takeaway here is that WE NEED SINGLES to go to print. Please do not submit your artwork as spreads as we will have to get in touch for you to resubmit and this can slow down your job. The most common reason we receive spread booklet artwork is because customers are offered this as a an option when exporting from InDesign. Make sure you click “export as singles” instead of spreads.
Booklet Pages:
It might be an easy thing to overlook but for double stapled/saddle-stitched jobs, we need the correct number of pages to go to print with. This number has to be divisible by 4 (8pp, 12pp, 16pp, 20pp etc.). The reason for this is that stapled booklets are made from stacking folded pages on top of each other and stapling. When you fold a page in half you are, in printing terms, left with a 4-page item (front cover, inside front cover, inside back cover, back cover). So when you stack two of these folded items on top of each other and staple them to make them a booklet, the number of pages is 8. Three would make 12pp. 4, 16pp etc. If your booklet artwork does not have the correct number of pages then consider inserting blank pages to bring it up to the correct amount. Alternatively, consider losing 2 pages instead.
Bleed:
The all-important bleed. Firstly, it is important to state that you don’t need to worry too much about this as long as a.) you don’t have anything important too close to the edge of the page (c.5mm), and b.) you don’t have anything that runs across the center fold, e.g. maps, time tables, background patterns, infographics etc.. If you don’t have either of these characteristics in your booklet artwork then we can run a automation that will ensure your artwork is print ready.
However, if you do have these elements in your booklet artwork then we do need your artwork with a 3mm bleed and, ideally, crop marks. If we have a look again at the example of perfect booklet artwork, you will see that it is set up with a 3mm bleed and crop marks:

More information on the importance of bleeds can be found here. What is more important here is to see how it works for booklet and artwork elements that run across the centerfold:
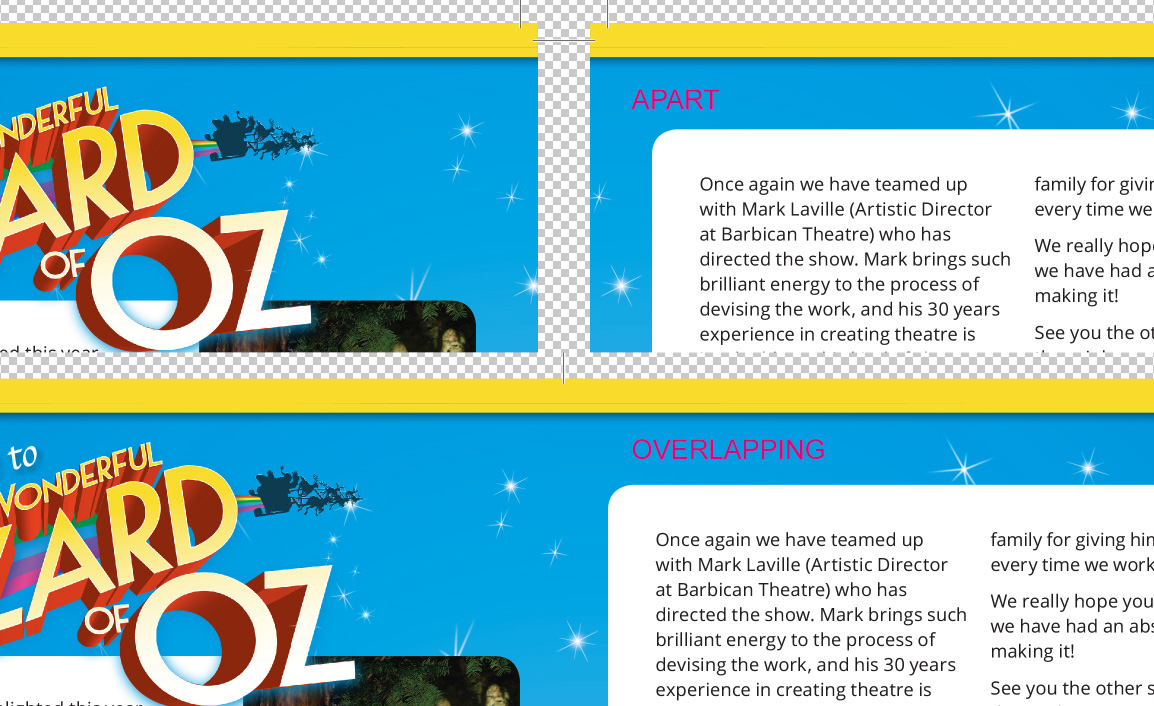
Above you can see that the top images has page 2 and 3 side-by-side for comparison with their 3mm bleeds and crop marks. The image underneath shows a version where the two pages have been brought across to overlap. You will see that they overlap perfectly allowing for the background star patter to match up correctly. This is because on the left hand page, the 3mm right hand bleed contains 3mm of content from the left hand side of the right pages…and vice versa. The takeaway from this if you want your artwork to flow smoothly across the centerfold then you need to incorporate your 3mm properly as in this example. Programs such as InDesign have settings that allow this to be taken care of when exporting to PDF. We strongly advise Googling this before submitting your artwork. We will be able to verify that you have it correct before going to print.
If you lack access to a professional designer or prefer working online, numerous excellent websites are available for creating funeral order of service online, as well as other booklet formats. In addition to facilitating online design, some platforms also offer seamless integration with the printing process for your creations. Utterly Printable, for example, offer a great "design-online" wedding order of service platform, which is paired with a professional print service. This can really help your online print journey!
The above artwork elements are unique to booklet printing but we recommend you read this page on our general guidelines for preparing your artwork for print noting especially the need to use CMYK colour mode and to flatten you artwork prior to submitting.
Please don’t hesitate to get in touch if you have any questions regarding the above. Out design team will be only tot happy to help
Thanks,